Wednesday, August 3, 2011

July 4: Stained Glass Jello

Need a festive dish to bring to some occasion?  Try Stained Glass Jello!  You can make it with any color/flavor Jello you wish so it'd be perfect for everything from Christmas to the 4th of July!  The boys thought it was "really cool" and while it takes a little time to make, the effort is minimal.

Stained Glass Jello
  • 4 boxes (3 oz. each) Jello in different colors (we used 2 boxes of strawberry and 2 boxes of blue raspberry)
  • 14 oz. can sweetened condensed milk
  • 2 envelopes unflavored Knox gelatine 
  • 6 cups water -- divided
1.   For each flavor of jello, dissolve one box in 1 cup boiling water.  Pour into a square container that is 6-8 inches square and chill at least 3 hours or overnight.  Try to use the same size pan for all four so the blocks come out about the same.  (I just used an 8x8 pan for the red and another 8x8 pan for the blue.)

2.  After chilling the flavors cut them into small blocks.

3.  Carefully mix the blocks in a 9x13 pan.  (If you're not planning on cutting out shapes, try to use a glass pan so everyone will be able to see the beautiful colors.)

Mixing the jello colors.

4.  In a separate bowl, sprinkle 2 envelopes of unflavored gelatin into 1/2 cup cold water.  Let it sit a few minutes and then add 1 1/2 cups boiling water and dissolve. 

5.  Add the can of sweetened condensed milk, stir, and let cool.

6.  Pour cooled milk mixture over the Jello blocks in the 9x13 pan. 

7.  Skim off any small bubbles that are created when you pour the milk over the Jello pieces.  (I forgot to do this and ours still turned out fine.)

8.  Chill at least 3 hours or overnight.

9.  Cut into blocks or shapes (we used stars) and serve.


Cleaning out the jello pans.
Enjoying the finished product.

July 1: Rolled Paper Flags

It's a holiday weekend!!!  I found instructions for a simple Rolled Paper Flag and thought it'd be perfect to make flags, not only for the 4th of July, but also for Canada Day since Daddy is from Canada and we still have family there!  Koen loved this project and carefully made each flag.  Tysen wasn't too enthusiastic about making anything so he half-heartedly made one flag before scooting off to find trouble elsewhere. 

I cut 12in. x18in. pieces of paper from an IKEA paper roll we had around.  Then I had the boys fold each one in half twice (short side-to-short side both times) to make four sections.  I traced one section with a pen so it was obvious where they had to cut since one section needed to be removed.  Koen had no problem with this step, but Ty got frustrated with the cutting which didn't help his already-wandering interest.


 Next, we rolled up the long end of the paper until it got to the one remaining section.  The boys taped the rolls down with long pieces of tape, and viola...we had a flag!

Ty holds his paper flag in front of his grumpy face.

Next, we decorated the flags.  Koen knew how each flag should look, so he immediately began painting a blue square and red stripes for the USA flag, reserving the silver star stickers from after the paint dried.  He then painted the red blocks on the sides of his Canadian flag before painting his hand red and making his hand print the Maple Leaf in the center (I saw this idea on a few different websites...I can't claim it as my own idea but thought it was brilliant!).  The flags turned out great (see below)!  Happy Patriotic Holidays! :)
Brielle had fun putting the star stickers
on the scrap papers.
The finished flags!  Aren't they great?!?

June 30: Palmer Park


Palmer Park

One of the items on our summer check list is "Visit a New Park"...meaning a new-to-us park.  Palmer Park is listed at grkids.com as a great park to check out, and since it isn't too far away from our house it became our "new park" choice. 

I actually missed the entrance to the park...not realizing it's the same entrance as the L.E. Kaufman Golf Course.  Once there, we needed to drive a ways on the property before arriving at the parks.  There were two play areas available, each near a pavilion or picnic area.  Of course, we had to play in both areas just to compare.  The second area was a bit more toddler-friendly which Brielle loved, and the boys enjoyed both areas.  Since they are walking distance from each other, it's no problem to play in both areas in one visit. 

We enjoyed our time there with friends from church -- picnic lunch and all!  It was quite nice that we were the only ones visiting the park so it was easy to keep track of the kids and let them run around.  They loved exploring the forest area, hunting bugs, and playing hide-and-seek .  I loved that it was shady!  The only thing to be aware of if you choose to visit the park is that the kids WILL get dirty!  But isn't that half the fun of being a kid? 
Koen took this picture of Brielle and me
coming down the twisty slide.
 Our friend, Noah, checks out Koen's work
behind the camera.


Koen and Ty down the twisty slide!


Kiersten and Ty playing in the dirt.


"Wheeee!"  Brielle said this each time
she slid down!  So cute!


Koen froggin' around.

Doesn't Brielle look stunning in Mom's sunglasses?
 She thought so!

Tuesday, August 2, 2011

June 29: VBS Week

It was Pandamania at church this week!  Our Vacation Bible School was a huge success with over 100 children in attendance each night!  Koen and Tysen were both able to participate in classes and both really enjoyed the VBS experience!  Neither boy chose to sing the songs...they both just sat and observed.  I'm not sure why they choose not to participate; I'm hoping it's just a phase.   

June 27: Monster Cookies

Per Daddy's request, we made Monster Cookies for our kitchen activity today.  These are a childhood memory for me...we often seemed to have these around.  Maybe it's the M&Ms that make them so appealing, or the peanut butter, or maybe the chocolate chips.  I just can't decide...

I asked the boys why they thought these cookies were called Monster Cookies.  They got wide-eyed and quite for a minute.  "Do you think monsters like to eat them?" I asked.  They quickly decided no. :)  Then I suggested maybe they got their name because the cookies got so monstrous in size, or maybe because they were so monstrous in numbers, but they didn't really care about those explanations. 

Of course, the favorite part of the activity was adding the M&Ms. :)  I told them each cookie needed four M&Ms and to try to use four different colors...good counting and sorting practice!  Ty got a little carried away, though, and often placed 6 M&Ms on one cookie and he really preferred cookies with all the same color M&Ms...I guess that's just a different kind of sorting. 
Monster Cookies
  • 3 eggs
  • 1 cup sugar
  • 1 cup brown sugar
  • 1 tsp. light Karo syrup
  • 2 tsp. baking soda
  • 1 stick oleo
  • 1 1/2 cups peanut butter
  • 4 1/2 cups quick oatmeal
  • 6 oz. chocolate chips
  • M&Ms
 Mix ingredients (except for M&Ms) in a large bowl.  Drop by teaspoonfuls on a cookie sheet.  Top each cookie with 4 M&Ms.  Bake 12 minutes at 350 degrees.  Enjoy!

June 19-26: Cousin Connection!

How do I write about a whole week of fun in just one post?  Uncle Mark, Aunt Jane, Evan, and Annika were in town from Arizona and Uncle Steve, Aunt Lori, Henry, and Evelyn were in from Chicago so we had a lot of family time!  Grandma and Grandpa treated everyone to a few nights at the Holiday Inn Express with a water park!  It was fabulous for the kids!  We also visited the Grand Rapids Children's Museum and Teusink's Pony Farm, a special place from my childhood.  We also splashed in the neighbor's pool and the slip-n-slide.  The kids enjoyed all the fun activities, but were thrilled just to have time to spend with their cousins!   

Tysen, Annika, Grandpa, Brielle, Evan, Koen, Henry, Grandma, and Evelyn.

Most of the grandkids:  Ty, Evan, Brielle, Henry, Koen, and Annika.

Friday, July 8, 2011

June 17: Wooden Puzzles

I found these Creatology wooden puzzles at Michael's a long time ago and promptly forgot about them.  I rediscovered them when I cleaned out the front closet not long ago.  I figured we should make them soon before I forgot about them again.

Tysen's wooden puzzle was a dinosaur.  The package said ages 4+, but I thought he could probably do it OK.  He punched out all the pieces but did need quite a bit of help putting it together.  We actually ended up gluing some of the pieces on since it didn't stay together very well.  He loved making his purple dinosaur!

Punching out the pieces.

The finished dino!


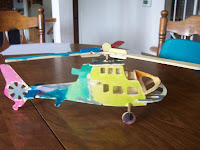
Koen's wooden puzzle was a helicopter.  I wasn't sure if he would be excited about this since his passion is trains, but Michael's didn't have any trains, and it's always good to try new things. :)  He was SUPER excited about his project and couldn't wait to complete it!  The project was designed for ages 6+, but he still needed help, especially with the assembly instructions which weren't always that easy for me to figure out.  But we did it!  I had to put most of it together, although he punched out all the pieces and helped me find all the parts we needed. 
Overall, I was a little disappointed that they couldn't do more of the puzzles themselves, but they both loved the process, so maybe this is just a stepping stone for crafting more models.  I was surprised the next day when Koen asked to paint his helicopter.  He got out his watercolors and went to work, spending quite a bit of time painting each section of his helicopter.  It looked fantastic!


The finished colorful helicopter.