Showing posts with label projects. Show all posts

Thursday, January 5, 2012

October 28: Fall Rocks!


True confessions:  I have never used ModPodge before!  I've heard many rave about it, and I've had it sitting in our craft closet for months!  Today was the day we broke out the ModPodge to make our Autumn Leaf Rocks.  This simple project turned out quite cute!  We grabbed some rocks from outside (Ty found some pieces of wood he wanted to use, too).  We painted the rocks with ModPodge and then used small leaves we'd found on our walk earlier in the week to create designs.  I also had pumpkin stickers that Ty thought would enhance the look of his wood pieces.  After placing our leaves/stickers on, we painted over everything with more ModPodge, let it dry, and viola!  A beautiful fall project!  We placed ours in a basket in the kitchen for all to enjoy and received many compliments on them.
Carefully placing each leaf.


Letting them dry.

Sunday, October 23, 2011

October 6: Ty Plans the Project


I had a project planned for today, but Ty declared that he was going to paint a dinosaur today.  Far be it from me to get in the way of his creativity, so "dinosaurs" it was!  He probably spent more time painting his pictures than he would have on my suggested project, and I'm sure he enjoyed it more since it was his idea!
Dino #1
Dino #2

September 29: Paper Strip Pumpkin

The fall season is here!  It's time to think leaves, apples, and pumpkins!  I saw this cute idea on allkidsnetwork.com.  To duplicate this craft, you'll need an empty toilet paper roll, orange and green construction paper, glue, tape, and a scissors. 

First, cut the toilet paper roll to half its height.  Cut a strip or orange paper and glue it around the tube.  Then cut 8 orange strips about 1 inch wide.  I was so proud of Ty;  he cut all the strips himself!  He's been resisting using a scissors and I haven't pushed him, but he did a fantastic job cutting these strips while I held the paper for him.  We're making progress! :) 

Tape one side of one strip inside the toilet paper tube at the 12 o'clock position, repeating at the 3, 6, and 9 positions.  Tape the next four strips inside the tube inbetween these first four.  Now tape the ends on the inside of the toilet paper tube on the other end.  Once all the strips are taped in place, cut a leaf out of the construction paper and tape it in the middle of the tube.  (I'm sure the website explains this whole process  much more clearly!) :) 

When the pumpkin was complete, Ty decided he wasn't quite finished with project time yet.  He pulled out the bag of puff balls and created his colorful lamb (below).  He was so careful in placing each puff ball and so proud of his finished project!

Wednesday, October 12, 2011

September 16: Flower Garden

Remember we went to story time at the library on Wednesday?  On our way out, I noticed a pile of project papers on the table by the door.  I grabbed one for each of the kids because I thought it was so cute!  They each got to create a flower garden (I know, a little more spring-themed, but they didn't care!).  We didn't get to project time until after Koen was home from school, so he got to put one together, too.

The kids enjoyed coloring the flowers...some attending to details more than others. :)  Koen cut his flowers out, but I had to cut for Ty and Brielle (I'm not sure why Ty is so against cutting paper...).  We then glued each flower on a popsicle stick and "planted" our gardens in the upside-down egg cartons. 


She made sure she used every color!


The kids were SO proud of these!  I thought it was really sweet, though, when Ty declared he wanted to give his garden to his cousin Henry (he knew we were off to visit them in Chicago the next day).  I thought he might change his mind as he's KING of changing his mind these days, but he was super excited to share it with Henry.  I would love to see his sincerity and generosity grow with him. :)

Saturday, September 3, 2011

September 2: Spiral Snakes


The kids are always up for painting, and I wanted something fairly simple to do today.  That resulted in Spiral Snakes from familycrafts.about.com.  Each kid painted a paper plate on both sides...even Brielle got into it!  The tough part with projects like this is waiting for the paint to dry before finishing the project. 

Once the paint was dry (a few hours later), I cut the plate into a spiral, we added some googly eyes and a red tongue, and the spiral snakes were complete!  Brielle thought hers (pictured below) was great!  She loved shaking it and playing with it!  Koen, who doesn't like snakes, decided to make a puppy face instead.  I'm not sure how that's coming, though.  He may just have had fun painting since his plate is still sitting on the counter.

Tuesday, August 9, 2011

July 29: Painted Butterflies

It seems that it's been a while since we've done a project.  I picked up these butterfly suncatchers at Michael's a long time ago.  They'd been sitting on the counter for a couple of days and the boys finally decided it was time to paint them.  They had a great time with them!  The butterflies came with pink, purple, and yellow paint, and Koen mixed the pink and yellow for some orange.  We taped them to our slider door after they had dried and admired the boys's beautiful work!  Unfortunately, the purple disappeared after one day!  Slowly, the colors have faded which has been disappointing for the kids, but the project itself was great!

Wednesday, August 3, 2011

July 8: Froot Loop Rainbows (an attempt)

Not every project turns out the way you think it will.  When I mentioned making Froot Loop Rainbows to the boys they were really excited!  I envisioned a curved row of red Froot Loops, followed by a curved row of oranges, yellows, etc.  I thought we'd glue them on the papers, maybe add some cotton balls for clouds, a fairly easy project that would incorporate sorting and organizing.  But that's not how the boys envisioned the project.  Both Koen and Tysen took one of each color, lined them up (at least they got them in correct order!), and then proceeded to eat ALL the Froot Loops I'd put out for them, only pausing to ask for more.  Oh well!
 

July 1: Rolled Paper Flags

It's a holiday weekend!!!  I found instructions for a simple Rolled Paper Flag and thought it'd be perfect to make flags, not only for the 4th of July, but also for Canada Day since Daddy is from Canada and we still have family there!  Koen loved this project and carefully made each flag.  Tysen wasn't too enthusiastic about making anything so he half-heartedly made one flag before scooting off to find trouble elsewhere. 

I cut 12in. x18in. pieces of paper from an IKEA paper roll we had around.  Then I had the boys fold each one in half twice (short side-to-short side both times) to make four sections.  I traced one section with a pen so it was obvious where they had to cut since one section needed to be removed.  Koen had no problem with this step, but Ty got frustrated with the cutting which didn't help his already-wandering interest.


 Next, we rolled up the long end of the paper until it got to the one remaining section.  The boys taped the rolls down with long pieces of tape, and viola...we had a flag!

Ty holds his paper flag in front of his grumpy face.

Next, we decorated the flags.  Koen knew how each flag should look, so he immediately began painting a blue square and red stripes for the USA flag, reserving the silver star stickers from after the paint dried.  He then painted the red blocks on the sides of his Canadian flag before painting his hand red and making his hand print the Maple Leaf in the center (I saw this idea on a few different websites...I can't claim it as my own idea but thought it was brilliant!).  The flags turned out great (see below)!  Happy Patriotic Holidays! :)
Brielle had fun putting the star stickers
on the scrap papers.
The finished flags!  Aren't they great?!?

Friday, July 8, 2011

June 17: Wooden Puzzles

I found these Creatology wooden puzzles at Michael's a long time ago and promptly forgot about them.  I rediscovered them when I cleaned out the front closet not long ago.  I figured we should make them soon before I forgot about them again.

Tysen's wooden puzzle was a dinosaur.  The package said ages 4+, but I thought he could probably do it OK.  He punched out all the pieces but did need quite a bit of help putting it together.  We actually ended up gluing some of the pieces on since it didn't stay together very well.  He loved making his purple dinosaur!

Punching out the pieces.

The finished dino!


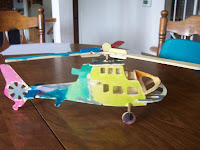
Koen's wooden puzzle was a helicopter.  I wasn't sure if he would be excited about this since his passion is trains, but Michael's didn't have any trains, and it's always good to try new things. :)  He was SUPER excited about his project and couldn't wait to complete it!  The project was designed for ages 6+, but he still needed help, especially with the assembly instructions which weren't always that easy for me to figure out.  But we did it!  I had to put most of it together, although he punched out all the pieces and helped me find all the parts we needed. 
Overall, I was a little disappointed that they couldn't do more of the puzzles themselves, but they both loved the process, so maybe this is just a stepping stone for crafting more models.  I was surprised the next day when Koen asked to paint his helicopter.  He got out his watercolors and went to work, spending quite a bit of time painting each section of his helicopter.  It looked fantastic!


The finished colorful helicopter.

Sunday, April 17, 2011

April 15: Palm Frond Collage

With Palm Sunday coming up this Sunday, I thought I'd introduce the celebration to Tysen with this project.  We talked about Jesus coming into a big city riding a donkey and how the people were so excited to see him that they waved these palm branches and laid them in the street for the donkey to step on.  Ty really had one question about the whole story:  Why?  And that question was repeated often as I tried to explain this event.  :)  So to make our palm leaf, I used this link as a guide:  Palm Frond Collage


I cut some strips of green construction paper and tissue paper.  I had Tysen snip them into smaller pieces.  He started out using his scissors but quickly discovered ripped worked better for him. 


I squeezed some glue onto the paper and had him spread it around with a paintbrush.  You can print the template from the link above. 


Tysen carefully placed the various green papers on the palm leaf paper.  He did a great job covering most of it!  After he finished, I cut out the palm shape (you can still see the lines if you use tissue paper), although I'd recommend waiting until it dries before you cut it out as it got a bit messy. :)  We then glued it on a black background.

The finished product!  Once it dries I'd like to add the word, "Hosanna!" at the top. 


Friday, February 18, 2011

February 18: Heart-y Animals

Still in the spirit of Valentine's Day week, I chose to do a craft involving hearts today.  About.com had a suggestion called "Heart-y Animals" where you could make a number of different animals out of various heart shapes.  Ty was looking over my shoulder and was really excited about making the elephant he saw, so that's what we did!  He didn't really care that we were using hearts to create our new friend, he just liked the elephant.  Ty chose green paper for his, and declared that his elephant must have googly eyes! 


It was a bit tricky for me just free-hand cutting out the hearts, but they turned out OK I think.  I was fortunate that I had a small heart punch so I could quickly and easily cut out all the little hearts used for the trunk.  While it turned out pretty cute, and Ty was thrilled with it, I was disappointed because it turned out to be a mostly-mommy project.  Ty did help me glue things down, but if I had really thought about it before starting, I would have realized he wasn't going to be able to do much of this craft by himself. 

Sunday, February 13, 2011

February 11: (Not So) Absorbing Artwork


Squirting colored water on the lines of glue and salt.

Family Fun is one of my favorite magazines to look through for ideas of projects to do with the kids.  The last one I decided to try was entitled "Absorbing Artwork," but it just didn't work very well.  Part of it might have been that I couldn't find and eyedropper around the house so we used an extra bulb syringe which would have allowed more water with each squirt.  It also may have turned out better if we'd used a random design of glue rather than a more structured picture of a house that Ty wanted.

Ty got more into things after the project was finished and we began mixing the colored water to create new colors.  His grand finale was combining all the colors into black! He was quite proud of his water! 

In case you'd like to attempt this project in hopes of better results...here are the instructions.  ("Absorbing Artwork" was from the November issue of Family Fun on page 108.)

Ty added more salt after he was finished painting
with the water...not in the instructions, but fun!


You will need:
-card stock
-rimmed baking sheet
-white glue
-salt
-colored water (food coloring added to change colors)

-eyedropper

Step 1:  Set the card stock on the baking sheet (we taped ours to the sheet) and have your child use the glue to draw a design on the paper.
Step 2:  Sprinkle the wet glue with salt until it's completely covered, then tap off any excess.


Step 3:  Have your child use the eyedropper to drip colored water, on drop at a time, onto the salt.  As the salt absorbs the liquid, the water will move along the glue lines, resulting in a wonderful web of color.  Be sure to watch what happens when the color reaches intersection lines.
Brielle sat and watched the whole process....
I thought this was a beautiful picture of her
so decided to share it here!

Tuesday, February 8, 2011

February 4: Koen's Project


Ty cut a bunch of paper slits while Koen glues his person together.
I really was prepared to do a project with the boys on this third snow day, but Koen stepped up and wanted to introduce his idea for a project.  I think it's wonderful that the boy who used to never want to do projects now comes up with his own ideas!  He said he hadn't made it before in school, he just came up with the idea on his own (though later it come out that he'd made an Indian in school using a similar strategy).  Koen specifically asked for different colored paper and had in mind the shapes he wanted to work with.  He told me I would know who he was making when he was finished...do you know who it is?
IT'S JESUS!!!

Monday, January 24, 2011

January 21: A Thomas Tunnel

Carefully painting.

Waiting for it to dry.
This project has been their FAVORITE project to date!!!  The boys receive the Thomas and Friends magazine (courtesy of Uncle Justin, Auntie Lindsey, and Isaac), and the most recent issue had the directions to make a tunnel for Thomas!  When Ty saw that in the magazine he immediately said, "Let's make a project!"  We didn't have all the materials (nor was it our designated "project day"), but I promised Ty we would make it after we got all the materials.  For us, finding a shoe box was the toughest part of the whole project!    


Carefully placing the tissue paper
 on the roof of the tunnel.

Project day is on Friday which is a school day for Koen, but I knew he'd want to be involved with this particular project.  Ty and I started it earlier in the day by cutting the tunnel out and painting the top and sides green, and painting bricks on the front and back as directed (though we did use different colors than the magazine suggested just because our shoe box was so dark).  The paint was dry within a few hours, so after supper we drew the cobblestones and added the "foliage" by gluing crumpled up green tissue paper to the top.  The magazine instructed us to add them to the sides as well, but the boys agreed they just wanted it on top. 


Crumpling the tissue paper with gusto.

Another difficult part of the project was waiting for it to dry -- first the paint and then the glue!  The boys could hardly wait to play with it, but since they've gotten the OK that it was dry, they've made it the center of their train stories.  I must admit that it did turn out pretty well and it really wasn't difficult to make. 


They are so proud of the finished tunnel!